DIY Kitchen Table – A Family Affair
Usually when I work on DIY projects, I do them by myself with a little boost from Daniel from time to time. But for the first time, we embarked on a DIY project from the onset together as a family. The three of us – two adults and a 4-year-old – made a kitchen table and it is….well, let’s just say, unique.
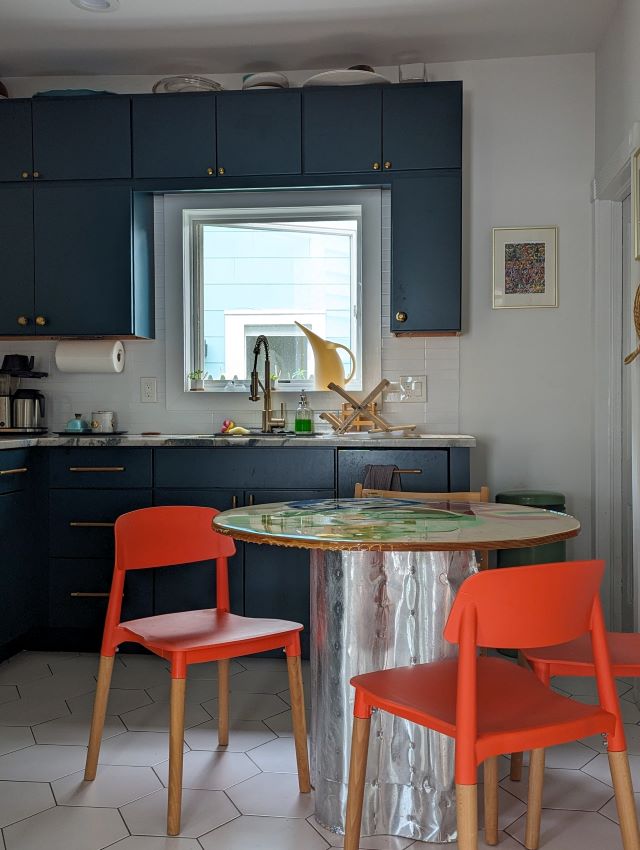
Our old kitchen table is a table from IKEA that you have no doubt seen countless times in many homes and restaurants over the years. Daniel got it before we even met so it’s served us well. But it’s a rectangle and our kitchen is a little tight with irregular angles so I wanted a round table that fit the size of the space and left room to maneuver around it. The perfect size to fit four people in our kitchen is a round table at 37.5″. You want to know what measurement is pretty hard to find? That one! Custom is always an option but, in my mind, if custom is an option, then so is DIY!
So I decided a DIY kitchen table would be a pretty cool next project and Daniel thought it might be even cooler if we made it together as a couple.
Several times while sitting at our table, August would say that the table would be better if he could color it and he really wanted to take markers and draw on it. I guess a plain wood surface is just not his jam.
That gave Daniel the idea to bring August into the experience and have him color the wood table top that we create, making this a full family DIY project.

You already know I wanted a round table top at 37.5″. The rest of the table top would be made of an inexpensive light wood at about 3/4″ that August could add color to. Then I wanted to epoxy the top to thicken it and hopefully prevent August from dinging holes into it.
The base was where I was getting the most creative. Yes, we absolutely could have just gotten any premade set of legs. Floyd makes legs that I’ve been looking at for maybe a decade now. Large hardware stores also sell premade legs that we could have stained or painted. Etsy sellers have plenty of options. But no, I had another idea.
I wanted the table base to be a series of undulating curves wrapped in metal. That is well beyond my skill set but that’s what I wanted so, I figured we could use concrete form tubes to create the curves and wrap it in a metal sheet (similar to how I used a metal sheet for our headboard). And then distress the metal to take off the shine.
So the table in the end would be a metal, curved, base centered under a colorful wood table top with an epoxy finish.
First, we cut out a circle from old cardboard boxes to make sure we had the right size in mind. As I’m typing this, I realize we should have used this template to draw out the circle in the wood, but we didn’t do that. Whoops!
Then we bought – and then bought more – concrete form tubes and used a circular saw to cut them down to the right height for the table legs. We used this video to help us create a guide and then used that guide to cut the tubes. This entire process was a lot harder and took a lot longer than I thought. I had to go back to the store to get more and more concrete form tubes until we had four that were close enough to the same height where we felt we could make a level table.

We used the pneumatic staple gun to staple them all together to create a shape that looks like a four leaf clover when looking down at the base from above. Then we made papier mache to solidify the shape and make the exterior look more like undulations than four separate tubes.
Finally, we wrapped the base in aluminum sheets (harder than it looks and it didn’t come out perfect). Then distressed it by sanding the aluminum, spraying it with bleach, leaving it out in the sun all day, and then repeating this process.

The base wasn’t totally level so we used a piece of cardboard to glue a shim to the bottom. At the top, we screwed in four L brackets (one for each tube) at different heights so that the L brackets themselves were level.
After researching some wood options and prices, we decided on getting Baltic birch. To draw the circle, I used a nail at center of the board, tied a string measured to the correct radius to the nail, tied a pencil to the other end, and sketched out the circle from there. This was harder than I thought (this is the theme!). Again, see my whoopsy above regarding what should have been the template.
August used craft paint and marker to draw and color in several images, including one he says is his face and one that is our house. Other images are a rainbow and a heart. And then he wrote his name.

Often on DIY projects, I get a new tool if it’s really necessary and for this, we bought a jigsaw. It was easy to use and a simple way to cut out the circle.
And then we used a resin, food-grade epoxy to cover the table top. This also did not go as planned, mainly because I read the directions on the box but I didn’t listen to Daniel when he made suggestions based on his further research on the internet. So several epoxy kits and way too much money later, Daniel literally took it into his own hands and finished the epoxy coating.

And now I want to paint and epoxy every project I do. I love the glossiness and the colors really pop!
After a week of letting the epoxy fully cure and then some, we screwed the table top in using the L brackets, and then it was all done.

Now we have a glossy, creative and very unique kitchen table that we as an entire family DIYed and that fits us and our kitchen space so well!


